A vital shipping program is central to e-commerce success. Very few e-commerce companies, however, know how to set one up. This guide will walk you through how to set up shipping on your Shopify store [and more].
It doesn’t matter if you have the best user experience and products on your website. Without the right shipping strategy to satisfy customers, you’re shooting yourself in the foot.
For example, a customer finds a product they like from your store and adds it to their cart. They discover your high shipping rates and start hesitating in their purchase. They search the web and look for cheaper alternatives. Next thing you know, they’re ditching their cart and going to your competition.
In this complete guide, you’ll learn everything about setting up a shipping strategy on Shopify to ensure this never happens. Here’s what we’ll cover (click any topic to jump ahead):
- Why you need a shipping strategy.
- Shopify’s default shipping options.
- How to set up shipping zones and rates from the Shopify admin.
- Should you offer free shipping?
- How to offer free shipping on Shopify.
- How to pick the proper packaging for orders.
- The best shipping tactics you can use to boost your business.
- Useful shipping apps you can download off Shopify.
- Use our Shipping on Shopify checklist to get started.
Let’s dive in.
Why You Need a Shipping Strategy
Your shipping strategy is what could make or break your online sales.
Don’t believe us? Check out these statistics:
- 93% of online buyers are encouraged to buy more if free shipping is available
- 45% of customers ditched their cart because of poor delivery options
- 61% of consumers are “somewhat likely” to cancel their purchase if free shipping is not offered
One thing to note is that your shipping strategy will change over time. For example, you might change your shipping carriers, price, unboxing material, etc.
What’s important is defining a game plan now and continuing to adjust as you grow.
Understanding the Different Default Shipping Options on Shopify
When you sign up with Shopify, the platform offers three different plans: Basic, Shopify, and Advanced.
Each plan you choose has different options and discounts when it comes to shipping. Depending on your Shopify plan, you might be eligible for reduced shipping rates from these three carriers:
-
- DHL Express
- UPS
- USPS
Let’s take a look at how each Shopify plan differs from each other:
| Basic Plan | Shopify Plan | Advanced Plan | |
| Monthly Price | $29/Mo | $79/Mo | $299/Mo |
| What does the plan consist of? | All the basics for starting a new business | Everything you need for a growing business | Advanced features for scaling your business |
| Shipping Discount | up to 64% | up to 72% | up to 74% |
| Print Shipping Labels | Yes | Yes | Yes |
| USPS Priority Mail Cubic pricing | Yes | Yes |
As you can see from the table above, the higher you upgrade, the more discounts you’ll get on shipping and labels. While each plan offers the possibility to print shipping labels, the basic plan doesn’t come with USPS Priority Mail Cubic pricing.
While Shopify offers reasonable rates, you’ll still gain more value using a shipping app. With Essential Hub, we connect all your eCommerce operations so you can get the best discounts and save up to 35% on shipping.
Shopify Shipping – How to Set up Zones and Rates
Once you decide which plan is the right fit for your business, it’s time to get started on your shipping strategy. The first thing you’ll have to do is set up your zones from the Shopify admin.
What Is a Shipping Zone?
On Shopify, a shipping zone is a specific location based on region or country. It defines where your package is shipping from and to which destination.
Your shipping zones play a vital role in setting up your rates. Typically, the farther you ship the item, the higher shipping costs will be.
Here’s how you can define your shipping zone from the Shopify admin:
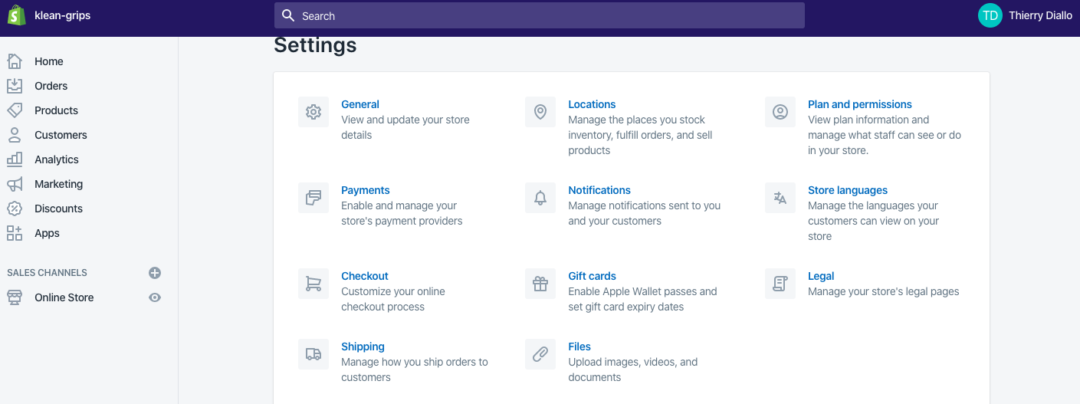
Step 1: Go to the Shipping Section From Your Admin
From your admin dashboard, click on “Settings” at the bottom left on your screen. Click on “Shipping” to start setting your zones and rates.

Step 2: Click on “Manage Rates”
Once you land on the shipping section, hover over the “General shipping rates” section and click on “manage rates.”
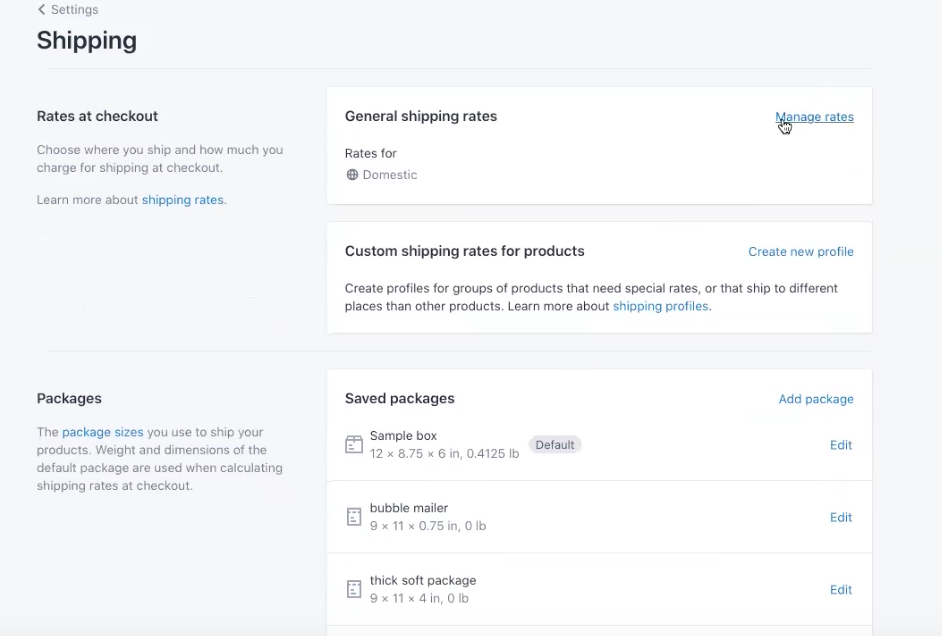
Step 3: Scroll Down and Click on “Create Shipping Zones”
On the “manage rates” section, You’ll get to see all of the products that you added to your store. Scroll down underneath to get access to your shipping zones.

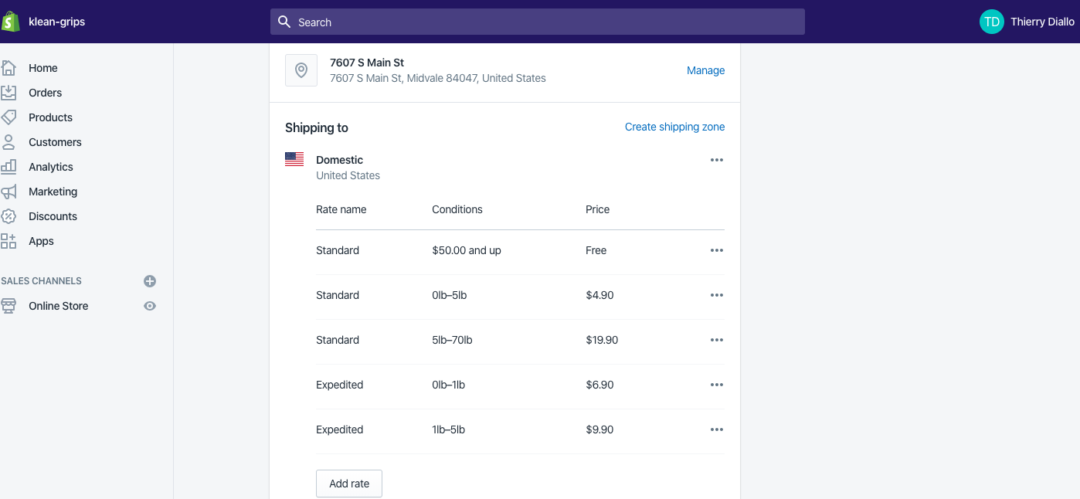
In the example above, we already defined some specific rules for shipping in the US. We’re offering shipping for product orders of $25 and up.
To create a new shipping zone, click on “create shipping zones”.
Step 4: Name Your Shipping Zone and Add Countries
In the textbox, add a name to your shipping zone to differentiate it from others.

When you create your zone, you can search and select countries where you want to ship. Once you choose them, click Done.
Step 5: Add Any Rates You Want for the Shipping Zone
Once you create your shipping zone, you can start adding rates that apply to it. You can set your own prices and let the shipping carrier do it.
Should You Offer Free Shipping?
As you set up your shipping zones and rates, you may ask yourself — should I offer free shipping or not?
You already know that customers love it. 91% of online customers will leave an eCommerce store if they don’t offer free shipping.
As practical as it may be for customers, free shipping might not be appropriate for your business. There are many different factors to consider before offering free shipping.
Here are a couple of things to consider before you make the jump and offer free shipping on your store:
You’ve Calculated Your Profit Margins
First, you’ll have to do some math to determine if free shipping is right for your business.
Keep in mind that you’re the one who’s going to have to cover the shipping costs. That often means you’ll have to increase the price of your product to cover costs.
You also have to be careful when raising the price of your item — you want the price to cover shipping and marketing costs but not high enough that it scares away customers from buying from you.
A good strategy on Shopify is to offer free shipping when a specific amount of items are ordered, which we’ll get into later.
Your Supplier Offers Free Shipping
Whether or not you should offer free shipping also depends on your supplier.
If the supplier you choose offers free shipping, then it’s ideal to offer free shipping to your customers. In this case, it won’t be fair to charge them for shipping costs.
If they don’t offer free shipping, however, it’s up to you to decide whether you want to cover the shipping costs and make your customers pay for them.
The Competition Is Offering Free Shipping
If competitors in your niche are offering free shipping as part of their strategy, then it’s best that you do the same.
You don’t want your store to be falling behind everyone. However, even if the competition isn’t offering free shipping, it could still be a way to make your business stand out from the crowd.
Online customers value free shipping during their purchase. If they explore their options and see that you’re the only one who offers free shipping, they’re most likely to pick you.
Your Customers’ Location
Ask yourself: where are your customers located? Are you only shipping to the United States, or do you have customers overseas as well?
The customer’s location has a significant influence on your shipping costs. That’s why it might be better for your store to offer free shipping only to specific locations.
How to Offer Free Shipping on Shopify
Once you’ve considered all these things and decided if your business will offer free shipping, it’s time to set it up on Shopify.
There are various ways you can set up your free shipping options from the Shopify admin. You can offer free shipping based on the following criteria:
- Product Cost
- Product weight
Let’s take a look at the different steps and ways you can set up your free shipping:
Step 1: Go to the Shipping Section From Your Admin
Similarly to setting your shipping zones, click “Settings” at the bottom left of the Shopify admin. After that, click on
“shipping.”
Step 2: Click on “Manage Rates”
Once you land on the page for “Manage Rates,” you want to scroll down and click the specific zone where you want to offer free shipping.
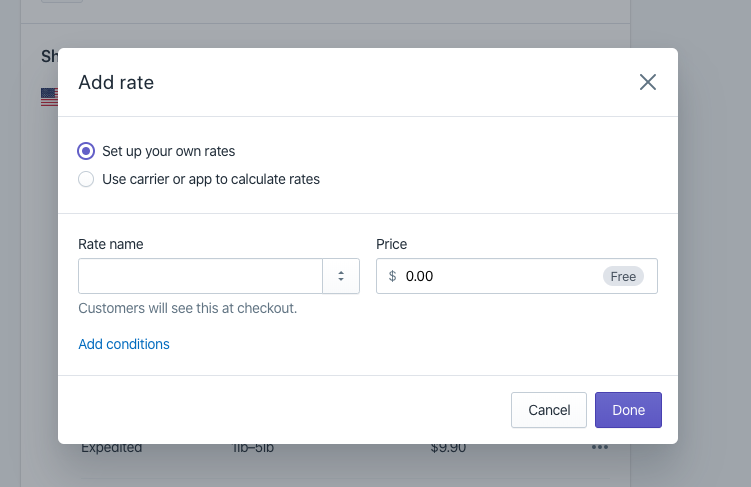
Step 3: Click on “Add Rate”
To set up your free shipping, click on “add rate.” It’s where you can create specific conditions for free shipping to apply.
Step 4: Type in Free Shipping and Click on “Add Conditions”
When you click on “add rate,” you’ll receive this popup on your Shopify admin:
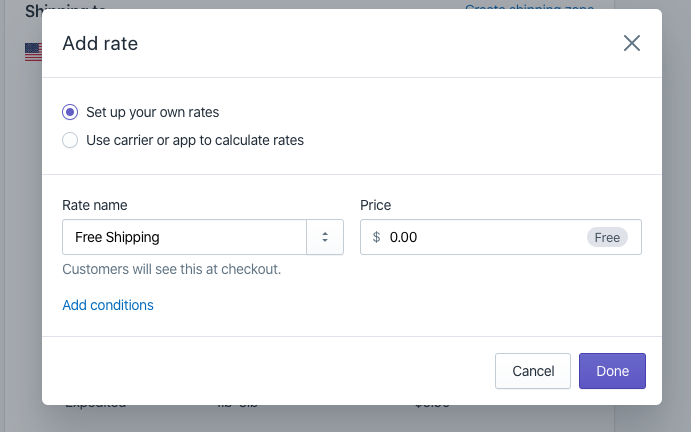
In the text box, type “Free Shipping” to differentiate the rate from others. Next, click on the “add conditions” button to define the conditions of your free shipping.
Step 5: Offer Free Shipping Based on Product Weight or Order Price
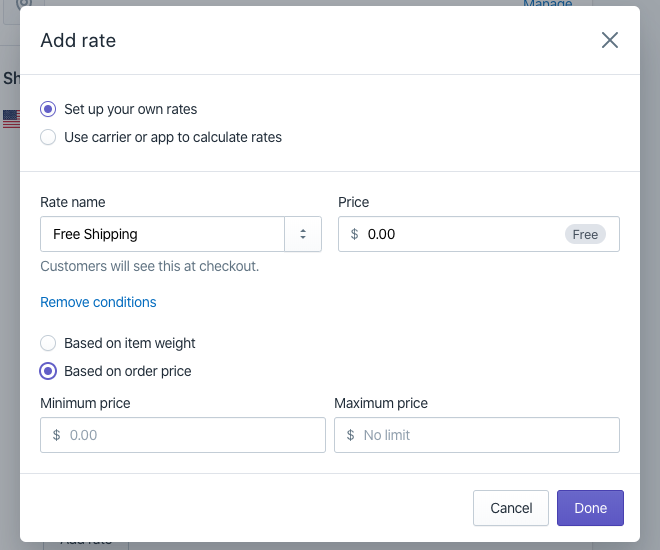
When you click on “add conditions,” Shopify offers you two choices: either provide free shipping based on weight or product price.
If you want free shipping based on order price, check the “Based on order price” box. You’ll be able to provide a minimum order amount for customers to qualify for free shipping.
However, to offer free shipping based on item weight, check the “Based on item weight” box. Here’s what will pop up on your Shopify admin:
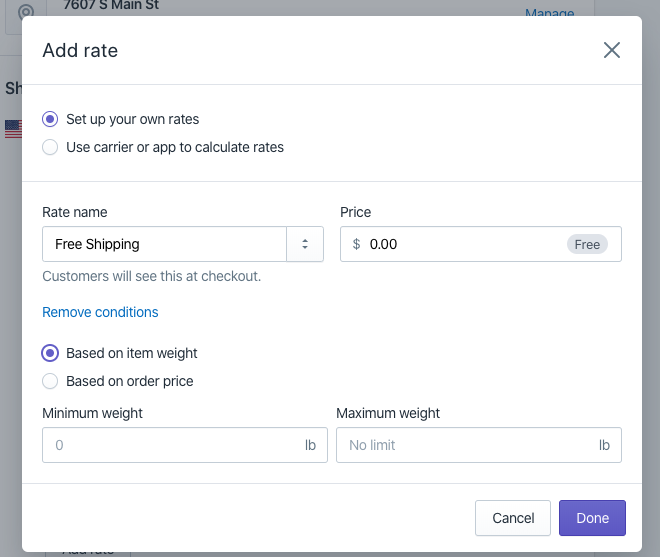
From there, type in the minimum item weight, and you’re good to go.
Choosing the Right Kind of Packaging for Your Orders
Packing is one of the most significant factors of a successful shipping strategy. You don’t want to make the mistake of spending more than you have on packaging or choosing the wrong material to transport your product.
Here’s how your store can select the proper packaging to fulfill your orders:
Determine Your Packaging Budget
First, you’ll need to assess your current budget for packaging.
How much money you’re willing to invest determines the packaging material you’ll use. For example, a popular brand option is corrugated cardboard, which ranges from around $.075 to $0.95.
It’s also possible to get free packaging from Shopify’s three leading carriers: DHL Express, UPS, and USPS. You can order your free shipping supplies online or pick them up. Check out free shipping supplies from the USPS here.
Pick the Appropriate Packaging Weight and Material
Since the shipping cost relies on the size and weight of your products, you want the packaging to be light. Your box should be big enough to transport your product but not heavy to the point it inflates your shipping costs.
For the best delivery, your order must be protected with suitable material. Here are examples of different types of packaging material you can choose from:
Paper and Cardboard
Cardboard is one of the best packaging materials for shipping. It’s low-cost, durable, and is easy to customize to reflect the look and feel of your brand. It’s particularly useful when it comes to shipping heavy products.
Poly Mailer
Poly mailers are lightweight and adjust to different product weights. They’re ideal if you’re shipping products that don’t need much cushioning, such as socks or shirts.
Plastic
What makes plastic practical for shipping is that it’s lightweight and flexible. As a result, you’ll be able to ship more items with less packaging material.
Airbags
Airbags are handy when filling up empty spaces in your packaging box. It’s something you want to consider if you sell items with sharp edges. They also act as cushioning for fragile objects.
Glass and Jars
The glass looks great aesthetically, and its transparent material makes your product visible. The obvious disadvantage, of course, is that it’s pretty fragile and can break during transportation.
To pick suitable packaging for your product, find and assemble different materials. From there, select the best fit for the product you plan to ship. While the outside might be plain, you can still create an incredible unboxing experience with a few simple additions inside the packaging.
Make Sure the Packaging Gets From Point A to Point B
It doesn’t matter how fancy your packaging looks. If your packaging can’t travel without being damaged, it will be useless.
It all goes back to picking the suitable material for packaging. If your packaging material isn’t strong enough, customers will receive broken or damaged products.
It will cost you less to invest in adequate packaging design than replacing damaged products.
Tactics You Can Use to Boost Your Shipping Strategy
As you can see from the above, Shopify makes it easy to set up and manage your shipping. If you want the best results, however, you also need some strategy.
Use Third-Party Shipping Software
If you’re handling one or two orders a day, then you won’t mind using the Shopify platform to print shipping labels. Once your volume rises, however, you’ll want to use a software program to help. Effective shipping software provides better rates, automation (always selecting the best price for the desired service level), and the ability to print labels either all at once or one at a time.
Essential Hub integrates with different software solutions to provide our clients with the best system for what they need. If you have any questions about the software, please reach out using the contact form at the end of this post.
Offer Free Shipping Without Hurting Your Profits
As mentioned earlier, free shipping is an effective way to capture customers’ attention and stand out from competitors. It’s a marketing tactic that can skyrocket your sales and continually drive new customers.
There’s a catch; however, remember that you need to think about how free shipping could potentially affect your profit margin. While free shipping can boost sales, you’ll have to cover all shipping costs as well.
One way to effectively do this is to offer free shipping when customers pay a certain amount in your store. It could help you squeeze in some cash to pay for shipping.
Let’s say, for example, that your average order cost is $22. To invite customers to pay more in your store without feeling like they’re being tricked into buying more, you can offer free shipping for orders above $25.
Alternatively, you can offer free shipping on any order with a particular product. You can choose those that you know have higher margins and can cover the cost of free shipping.
Another option is to offer a membership program for customers who seek free shipping. Customers are charged a yearly or monthly fee in exchange for free shipping on items.
It’s all about testing what works and making changes from there.
Make Your Order Fulfillment and Return Policies Clear
Your store needs a concise order policy that sets clear expectations between you and your customers. Setting clear expectations is a simple tip when getting started in shipping.
Online shoppers want access to all relevant information about shipping. They need to know where you ship to and when they can expect the item to arrive.
One thing that matters to them, in particular, is your shipping cost.
For example, if part of your strategy is to offer free shipping, you need to mention this the second visitors land on your home page. Doing so could completely transform your conversions.
When announcing free shipping on your website theme, make sure you make it work in the Shopify backend by setting it as a rule. This can be done by making an announcement under your theme settings.
If you’re delivering overseas, customers need to know exactly how much they’ll pay to cover shipping. Nobody likes nasty surprises.
Here are some questions that your shipping policy should cover:
- Which countries do you ship to, and which do you not?
- What shipping method do you use?
- Do customers get access to shipping tracking information?
- Can customers pick up your item at a physical location?
- What is the procedure and deadline for refunds?
Charge by Flat Rate
Flat rate shipping consists of offering a single rate for shipping an item, regardless of weight or size.
It means that the value or size of products doesn’t get taken into account. For many eCommerce brands, this simplifies the shipping process and encourages buyers to spend more.
For example, for each order, you could offer a flat rate of $5.
Setting up a flat rate is a good strategy if you’re starting out and don’t know how much your shipping costs will be. However, you can still offer different rates based on how fast the customer wants to receive the item.
For example, if customers really want to get your product in two days, you can set up a special rate for two-day shipping on Shopify. They’ll receive the item faster, expecting that they’ll have to pay a higher flat rate.
Get Insurance for High-Value or Fragile Items
If you’re selling an expensive or fragile item, you want to ensure you get insurance to protect it in case issues arise.
Insurance is handy if your product gets lost, stolen, or broken during shipping. When something goes wrong, you’ll need to prove the item’s value, and the insurer will pay you back the total amount.
While insurance is helpful, remember that you might have to raise your shipping rates to cover it. Logistical services such as USPS, UPS, and DHL only offer free insurance for items up to $100.
Alternatively, there are some really great services out there, like Route, an app we will review below. They let the customer add insurance at checkout and manage any issues with lost, stolen, or damaged packages.
Actively Engage With Customers During Ship”
ing With Email Marketing
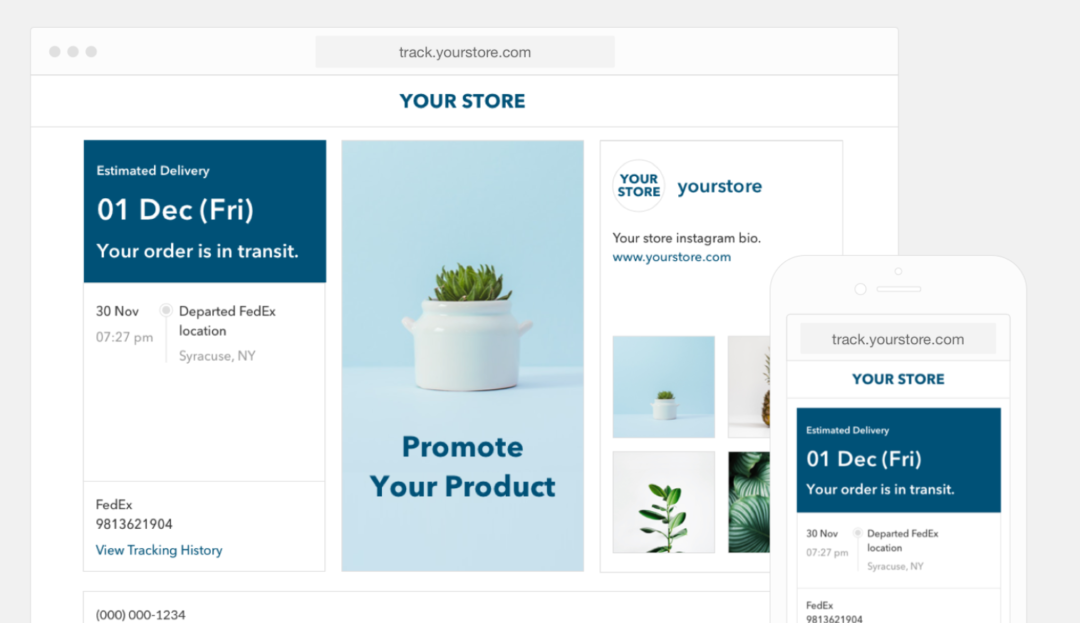
Once the item gets shipped out, it’s an excellent time to engage with customers and improve their experience with your brand.
A good tactic is to send email updates to your customers once the item ships. You can also feature sales and promotions for other products that could interest them.
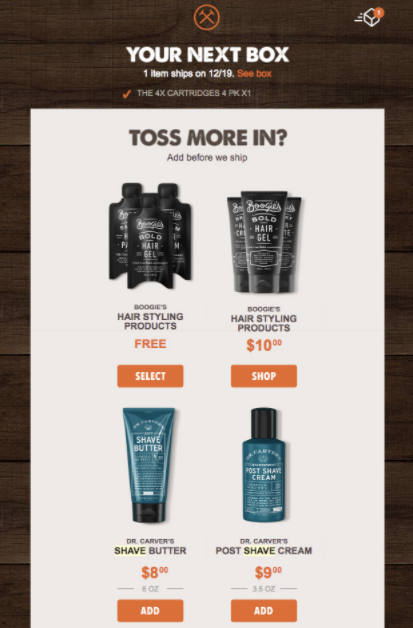
Check out this perfect example from The Dollar Shave Club. Each time a customer buys from their store, they receive an order confirmation email with the shipping date and items they can buy before the product ships:
Offer Same-Day Delivery
Offering same-day delivery can boost your sales and make you stand out from other stores. 61% of customers will pay extra bucks to get their products shipped the same day.
Same-day delivery is a great way to boost customer satisfaction and brand loyalty. Best Buy, for example, has rolled out same-day delivery since 2015:
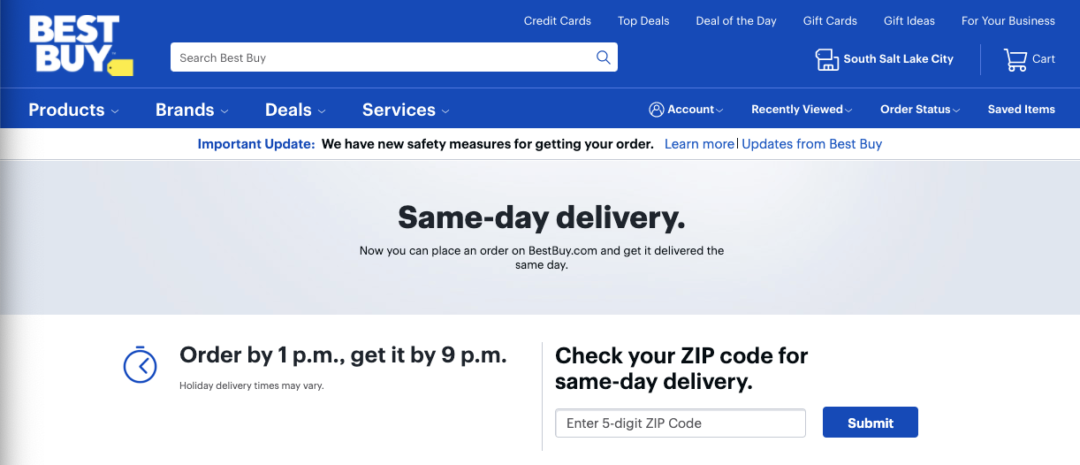
To take advantage of same-day delivery, customers must order with Best Buy Before 3 p.m. local time. It’s available seven days a week, and shipping costs depend on the product.
When offering same-day delivery, you need to measure how it’s impacting your sales. If more transactions are driven thanks to it, and it’s enough to pay for shipping, then it’s a good strategy.
To set up same-day delivery on Shopify, take advantage of their same-day app – you can find it on the app store. To set up local delivery, you’ll need to turn on one of your locations as available. You can do this through the Admin panel settings Shipping and Delivery button Local Delivery section (click manage next to a location).
Create An Incredible Unboxing Experience
Your goal as an online store should always be to stand out from the crowd. One excellent way you can do this is to ensure customers remember to open your packages every time.
A unique unboxing experience makes your business memorable and leaves customers hungry for more. As a result, you’ll create a loyal customer base that will repeatedly return to your site.
Here are some ideas of how you can do this:
- Make your packaging material branded or unique. Whatever you use as filler to protect the contents can be colorful and wow your customer.
- Provide a custom thank you. A simple note with the customer’s name, even hand-written and signed, goes a long way to improving customer retention.
- Give a free sample. Do you have other products that make sense to give away? These can act like a simple gift showing off your additional products.
- Include discount codes or special offers. Give them a reason to revisit your website!
- Add branded stickers inside and out.
- Focus on creating epic packaging like this from nuts.com
The best part is that you don’t have to spend much money creating custom packages for all the different sizes you ship. With stickers on the outside and cool stuff inside, you can make any package stand out!
Useful Apps That Will Up Your Shipping on Shopify
Before we conclude, there are many apps you can use on Shopify that make the shipping process so much easier for you and your customers.
Here are the best apps you can integrate on your Shopify store to better manage shipping at each stage of the product delivery:
1. Free Shipping Bar
Free Shipping Bar is a tool that displays your free shipping offer in a bar on your website that you can easily customize. Its goal is to encourage customers to add to their carts and buy more.
As customers add more to their cart, the Free Shipping Bar will show them progressive messages on how much they have left before they get free shipping.
You can congratulate customers once they have landed on a free shipping offer and measure the results of each bar to see which free shipping goals create more sales.
As a bonus, its currency detection features make it easy to auto-detect the local currencies of visitors. The platform then converts the free shipping amount with real-time exchange rates.
Pricing:
- Basic Plan: Free with limited options
- Premium Plan: $9.99 per month — gain access to unlimited active bars, Performance tracking, Auto currency conversion, and more
2. Parcelify
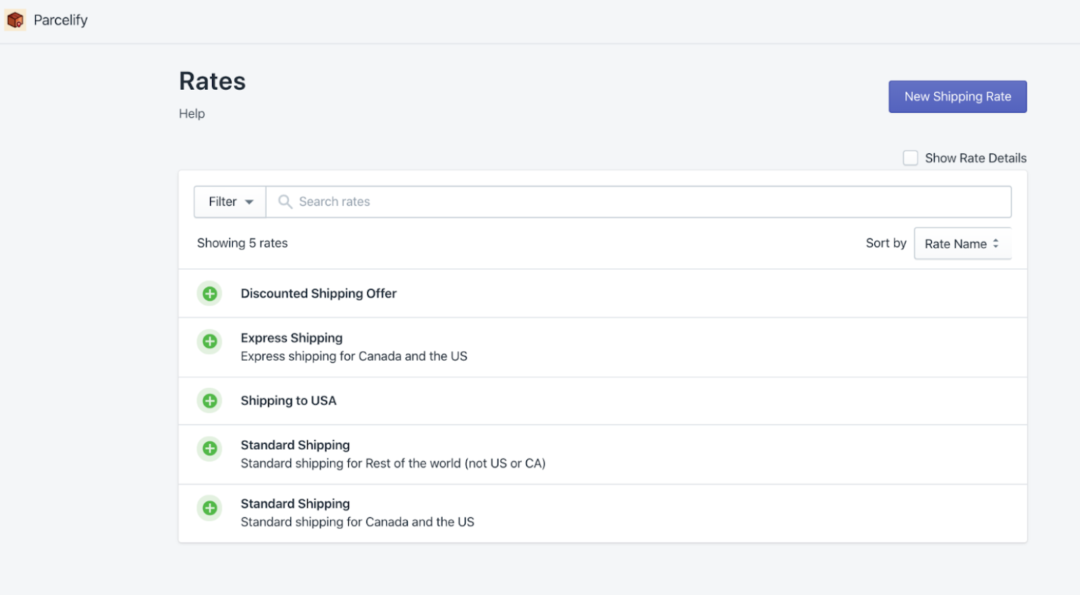
Parcelify makes it simple to create custom rates for your Shopify store.
With Parcelify, you control the shipping pricing and options that customers see during checkout. Customers can get live, accurate rates of what they’re actually paying for shipping.
Parcefily also comes with local delivery and in-store pickup. With cheaper options to receive their product, you’ll satisfy customers and drive more repeat purchases.
Pricing:
- Basic Plan: $12.99 per month. Parcelify comes with a free unlimited 14-day trial.
3. AfterShip
Tracking and managing each customer shipment can be a time-consuming headache. Aftership cuts the work in half by tracking all shipments across 600+ carriers in one place.
AfterShip is currently being used by more than 30,000 Shopify stores worldwide. You’ll be able to keep customers updated on the placement of their orders and when they can expect delivery.
As a result, your store will see a drastic decrease in customer inquiries and complaints.
Pricing:
- Free Plan: Free for 50 monthly trackings with no extra charge
- Essential Plan: $9 per month for 100 monthly trackings with $0.08 per extra tracking
- Growth Plan: $29 per month for 500 monthly trackings with $0.08 per extra tracking
- Pro Plan: $99 per month for 2000 monthly trackings with $0.08 per extra tracking
- Advanced Plan: $199 per month for 5000 monthly trackings with $0.08 per extra tracking
4. Tracktor
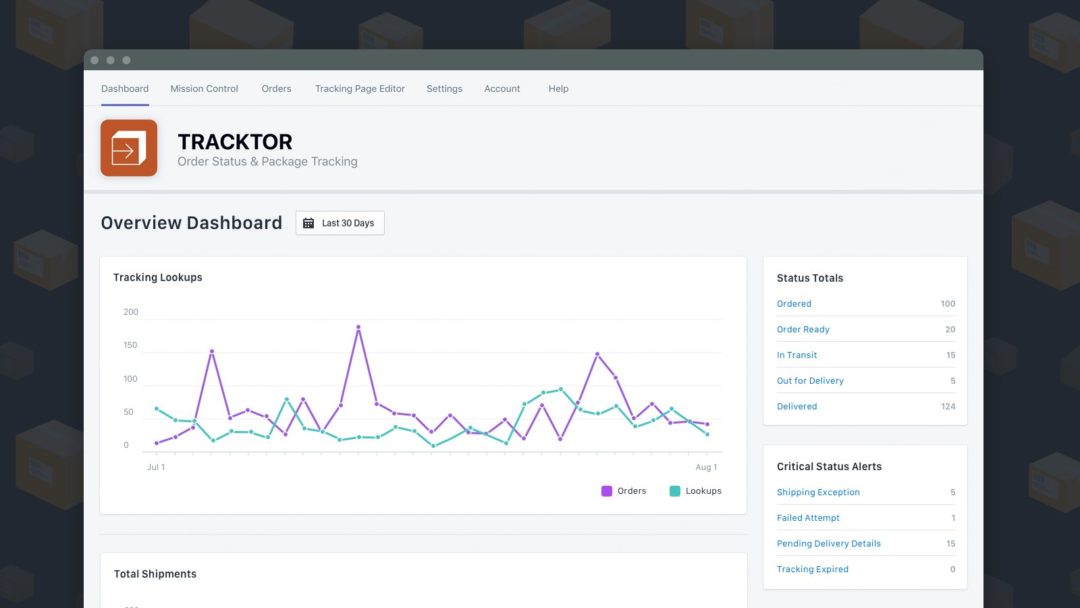
The modern customer has higher expectations than before. One of those expectations is expedited shipping and being able to track down exactly when their item arrives.
That’s where Tracktor comes in.
Tracktor makes it easy for customers and store owners to track down the delivery of a shipped item. The platform integrates with hundreds of carriers across the globe, so you can track exactly where the package is going.
The best part? You can do all of this from a single app. Customers won’t have to come to you and ask, “Where’s my order?” anymore. As a result, you’ll boost customer satisfaction and reduce support costs.

Pricing:
- Basic: $5.99 per month
- Professional: $14.99 per month with custom branding
- Premium: $44.99 per month with custom branding and custom order statuses
- Enterprise: $119.99 per month with custom branding onboarding services and more feature
5. Route – Shipping Insurance

No one can predict what can happen to your product during shipping, which is why getting insurance is so important.
Route is a tool that offers insurance on any item that gets lost broken or stolen during delivery. Customers gain peace of mind knowing that their purchases are guaranteed, and you get to keep more of your revenue.
Since Route covers the cost of refunds, you won’t be losing any money. The app is also 100% free for merchants and only takes a few minutes to set up on your store.
Pricing:
- Free
6. Aftership Returns Center
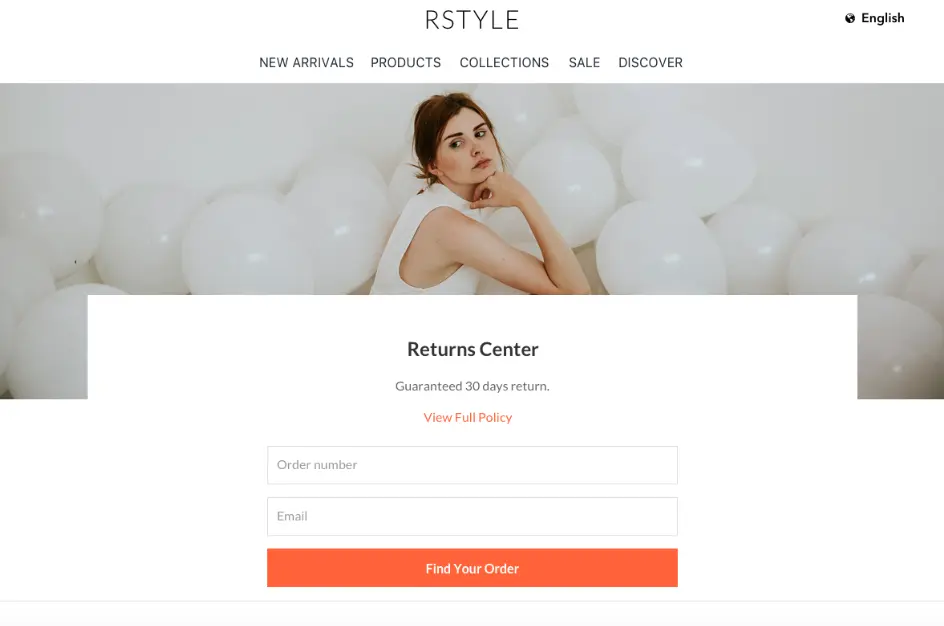
As frustrating as custom returns can be, there’s software you can use to handle returns more efficiently. Aftership Returns Center uses automation to track and manage your returns like child’s play.
When you integrate Aftership into your online store, you’ll be able to:
-
-
- Manage all of your returns in one dashboard
- Process refunds easily
- Automatically send notifications to users on the status of their returns
- Make returns a simple one-click process for buyers
-
Pricing:
- Starter: Free for up to 3 return quotas per month. $0.5 for each extra return.
- Essential: $9 per month for up to 20 monthly return quotas. $0.5 for each extra return.
- Growth: $29 per month for up to 100 monthly return quotas. $0.5 for each extra return.
- Pro: $99 per month for up to 400 return quotas. $0.5 for each extra return.
- Advanced: $199 per month for up to 1000 return quotas. $0.5 for each extra return.
7. Sales Box
Sales Box offers an exciting way to manage shipping and personalize offers for your customers.
Your store can set up different shipping fees and promotions for individual products or countries. Right under the “add to cart” button, customers will have all the shipping information.
Each sales box is fully customizable and easy to edit. No coding knowledge is necessary — you get instant access to templates that make your offer stand out.
Pricing:
- Basic Plan: $19 per month. The app comes with a 7-day free trial with unlimited features.
Next Steps
There you have it! By following our tips and tricks above, you should have a solid roadmap of where to go with your shipping strategy. It might require some testing, but soon enough, you’ll be able to blow customers away with your fantastic service and delivery.